
- 189 messages
- October 27, 2012 01:33
Fotografie is een breed onderwerp. Een duidelijke scherpe foto van een object ter grootte van een menselijke duim maken is moelijker dan je denkt. Zoals iedereen weet, een foto is een moment opname. de kwaliteit van het vastgelegde moment hangt natuurlijk af van het soort toestel je gebruikt, een prof spiegel reflex camera zal altijd betere fotos maken dan onze smartphones. Maar tegenwoordig gaat t erg snel met de technologie dus met een iPhone met eventuele lens-gadgets kom je een heel eind.
Het enige wat je nodig bent is de juiste hoek met de juiste belichting, of dit nu binnenshuis is, met of zonder extra lampen, of buiten in het daglicht, maakt niet uit.
Het liefst sta ik buiten op een tafeltje met een ministatiefje, maar als het weer es geen weer is in Nederland gebruik ik vaak een kamer binnenshuis op de noordzijde met 'indirect' lichtinval van buitenaf. Zet het tafeltje dichtbij t raam met de meeste lichtinval, en probeer wat verschillende posities, tot je de ideale positie hebt gevonden. let op dat je geen weerspiegelingen (van of via het raam) in je lens pakt, dit werkt erg verstorend in t eindresultaat. Op deze manier heb ik al heel wat zeer duidelijke detail opnamen gemaakt. Zonder flitser !!! Zelfs van LP hoezen die te groot zijn voor een A4 flatbed scanner.
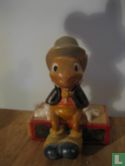
De positie van het te fotograferen object, in dit geval een modelauto, is geheel aan jezelf om te bepalen. Maar wel een verzoek om de achtegrond neutraal te houden, probeer je model op een lichte achtergrond te fotograferen, met de lichtval op de voorkant van je model, dus de zijde die je fotografeert.
Niet mooie foto; als je het model voor t raam zet en tegen het licht in de foto neemt, dan krijg je de schaduw-zijde van je model op de foto, en is er bijna geen detail te zien. (een zogenaamde 'tegenlicht-opname')
Om een scherpe foto te maken is t van belang dat de lens absoluut stilstaat. Een (mini) tripod of driepoot is hiervoor de beste oplossing, die dingen zijn al vanaf 5 euro te koop. Of zelf iets improviseren... Is voor een handige Harry geen probleem, toch?
Fotos bewerken doe je met een programma wat daar specifiek voor is bedoelt. Het populaire Photoshop is daar een voorbeeld van. Heb je deze mogelijkheid niet? Geen probleem, als je de standaard genomen foto van je smartphone toevoegd wordt deze automatisch verkleind naar de standaard maximale maten in Catawiki. voor degenen die wel bewerken; de maximale toegestane pixelgrootte is 700x700 pixels. Als je de achtergrond zoveel mogelijk weg knipt en t model daarmee naar voren haalt krijg je t mooiste resultaat.
oh ennuh, vergeet niet af en toe es de lens stof-vrij te maken met een soft doekje...
have fun.
Photography is a broad subject. Getting a clear, sharp photo of an object the size of a human thumb is harder than you think. As everyone knows, a photo is a snapshot. the quality of the captured moment depends of course on the type of device you use, a professional SLR camera will always take better photos than our smartphones. But nowadays the technology is going very fast, so with an iPhone with any lens gadgets you can go a long way.
All you need is the right angle with the right lighting, whether indoors, with or without extra lights, or outdoors in daylight, it doesn't matter.
I prefer to stand outside on a table with a mini tripod, but when the weather is not bad in the Netherlands, I often use a room indoors on the north side with 'indirect' light from the outside. Place the table close to the window with the most light, and try some different positions until you find the ideal position. make sure you do not catch reflections (from or through the window) in your lens, this is very disruptive in the end result. In this way I have already made a lot of very clear detail shots. Without flash !!! Even from LP sleeves that are too large for an A4 flatbed scanner.
The position of the object to be photographed, in this case a model car, is entirely up to you to determine. But a request to keep the background neutral, try to photograph your model on a light background, with the light on the front of your model, so the side that you are photographing.
Not a pretty picture ; if you put the model in front of the window and take it in the photo against the light, you get the shadow side of your model in the photo, and there is almost no detail to be seen. (a so-called 'backlight shot')
To take a sharp photo it is important that the lens is absolutely still. A (mini) tripod or tripod is the best solution for this, these things are for sale from 5 euros. Or improvise something yourself ... Isn't a problem for a handy Harry, right?
Editing photos is done with a program that is specifically intended for that purpose. The popular Photoshop is an example of this. Do you not have this opportunity? No problem, if you add the standard photo taken from your smartphone, it will automatically be resized to the standard maximum sizes in Catawiki. for those who do edit; the maximum pixel size allowed is 700x700 pixels. If you cut the background as much as possible and bring the model forward with it, you will get the best result.
oh ennuh, don't forget to dust-free the lens every now and then with a soft cloth ...
have fun.
- 189 messages
- October 27, 2012 02:45
Stof... de grootste vijand van de fotograaf.
En ook de modelautos die al wat jaartjes in de vitrine staan zijn vaak voorzien van een laagje fijn-stof.
nog een tip... maak t model eerst goed schoon voor je t op de foto zet. Dit staat beter in de database en het bevorderd ook de verkoop. Wees extra voorzichtig met eventuele labels of decals, deze kunnen vaak niet tegen water.
een standaard louw sopje met dreft doet bij mij al jaren wonderen. in extreme gevallen en alleen op modellen zonder labels of decals gebruik ik wel es een oude penceel met korte kwast-haren met een beetje tandpasta om erg vuil te verwijderen. Maar nogmaals... Handle with Care!
Dust ... the photographer's worst enemy.
And also the model cars that have been in the display case for a few years are often provided with a layer of fine dust.
another tip ... clean your model thoroughly before taking your picture. This is better in the database and it also promotes sales. Be extra careful with any labels or decals, they often cannot withstand water.
a standard louw soapy water with dreft has worked wonders for me for years. In extreme cases and only on models without labels or decals, I do use an old brush with short brush bristles with a little toothpaste to remove very dirt. But again ... Handle with Care!
- Catalogue administrator
- 2,415 messages
- October 27, 2012 05:49
Het verkleinen doet CataWiki meestal wel als je een foto tot 5 Mb (dacht ik, kan minder zijn) groot aanlevert. De grootte van het bestand is inderdaad belangrijk, omdat anders de invoer daar al mis kan gaan.
Verder is het ook van belang dat er zo weinig mogelijk achtergrond op de foto komt. Dit kan bijna alleen maar mogelijk gemaakt worden met een fotobewerkingsprogramma. Er bestaan diverse fotobewerkingsprogramma's, waarvan Photoshop de duurste is. Voor wie het goedkoper wil doen zijn er diverse gratis programma's. Het makkelijkst is Picasa en het meest uitgebreid is GIMP of Paint.Net. Wat je vervolgens doet is het afsnijden van de overbodige achtergrond en slaat het opnieuw op. Die afbeelding plaats je op CataWiki.
Bij auto's is het ook van belang dat je een foto plaatst van de onderkant met het merk duidelijk in beeld en vaak ook het nummer of andere details. Plaats die foto bij afbeelding 2 of 3.
Bovenstaande uitleg gaat ervan uit dat de foto geplaatst wordt met je computer.
CataWiki usually does the resizing if you provide a photo up to 5 Mb (I thought, could be less) in size. The size of the file is indeed important, because otherwise the input can go wrong there.
It is also important that as little background as possible is added to the photo. This can almost only be made possible with a photo editing program. There are various photo editing programs, of which Photoshop is the most expensive. For those who want to do it cheaper, there are various free programs. The easiest is Picasa and the most comprehensive is GIMP or Paint.Net. What you do next is to cut off the unnecessary background and save it again. You place that image on CataWiki.
With cars it is also important that you place a picture of the bottom with the brand clearly in the picture and often also the number or other details. Place that photo with image 2 or 3.
The above explanation assumes that the photo will be placed with your computer.
- 189 messages
- October 27, 2012 10:14
--
-

- Catalogue administrator
- 4,226 messages
- October 27, 2012 10:47
edit
edit
- 189 messages
- October 27, 2012 11:32
.
.
- 189 messages
- October 27, 2012 11:38
-
-
- 189 messages
- October 27, 2012 12:11
-
-
Ik wil meer dan 3 afbeeldingen gebruiken, kan dat en hoe? Volgens de veiling instructies moet het mogelijk zijn.
I want to use more than 3 images, is that possible and how? According to the auction instructions it should be possible.

- Catalogue manager
- 8,580 messages
- November 17, 2012 02:13
In de catalogus is er een max van 3 afbeeldingen per item. Als je daarna iets aanbiedt op een veiling, is er volgens mij geen maximum aan de afbeeldingen die je daarvoor aan de veilingmeester kunt aanleveren.
In the catalog there is a maximum of 3 images per item. If you subsequently offer something at an auction, I don't think there is a maximum to the images that you can submit to the auctioneer.

- Catalogue administrator
- 2,918 messages
- November 17, 2012 06:05

- Catalogue administrator
- 2,432 messages
- November 17, 2012 08:16